
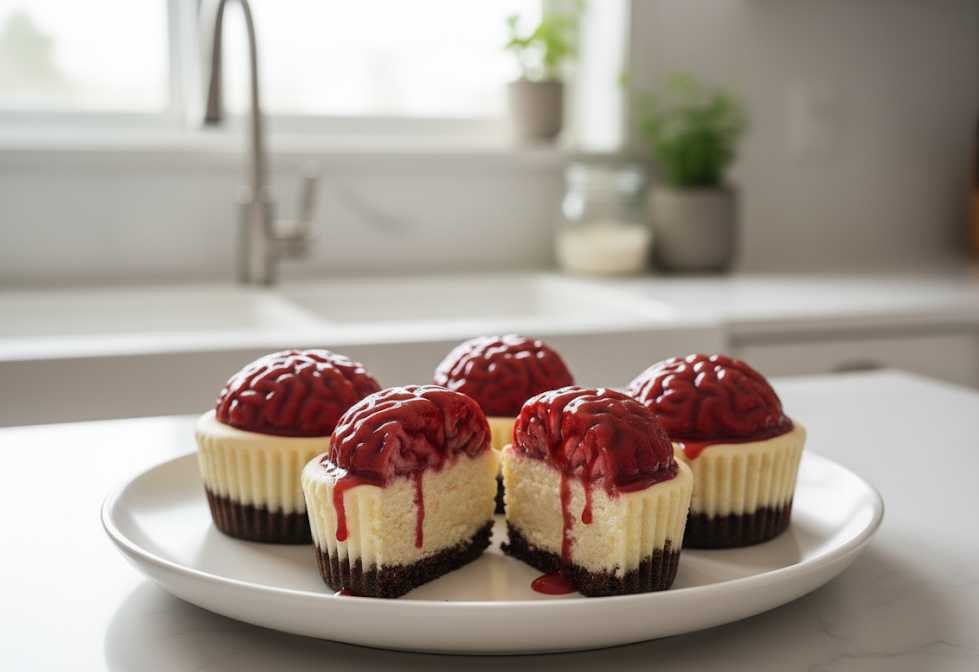
Some desserts are cute, some are spooky, and some are a delicious mix of both — like these Bleeding Brain Cheesecake Cups. The first time I imagined making them, I couldn’t help but smile at how creepy and fun they looked while knowing they’d taste utterly irresistible. The creamy cheesecake base is perfectly smooth, while the “bleeding” raspberry or strawberry topping adds that dramatic, eye-catching effect that makes this dessert a real conversation starter. Honestly, making them felt like creating a little edible horror art — and I loved every messy, sweet moment of it!
✅ Ingredients (Makes 8–10 Mini Cheesecakes)
Cookie Crust:
- 1 ½ cups crushed chocolate cookies (Oreos or chocolate digestives)
- 3 tbsp melted butter
Cheesecake Filling:
- 450g (16 oz) cream cheese — room temperature
- ½ cup sugar
- 2 tbsp sour cream or Greek yogurt
- 1 tsp vanilla extract
- 1 egg + 1 egg yolk
Bloody Cherry Brains:
- 8–10 silicone brain-shaped chocolates OR marshmallow brains (store-bought molds or premade candies)
- 1 cup cherry pie filling or cherry compote
- Optional: red food coloring for a deeper “blood” effect
🎃 Why I Fell in Love with These Halloween Cheesecakes
The first time I made them, I couldn’t stop laughing while decorating — they looked too real. But when I finally tasted one… creamy cheesecake, crunchy base, juicy cherry topping — it was spooky perfection. From that moment, I knew: cute desserts are fun… but scary desserts are legendary.
🧑🍳 Instructions
- Preheat your oven to 160°C (320°F). Line a muffin tin with cupcake liners.
- Make the crust: Mix crushed cookies with melted butter and press 1–2 tablespoons firmly into each liner. Bake for 5 minutes, then let cool slightly.
- Prepare cheesecake filling: Beat cream cheese and sugar until smooth. Add sour cream, vanilla, egg, and egg yolk. Mix until just combined.
- Fill & bake: Pour batter over the crusts, filling each cup about ¾ full. Bake for 15–18 minutes — centers should be slightly wobbly.
- Cool completely at room temperature, then chill for at least 1 hour.
- Add the brains: Place one brain-shaped candy or molded chocolate on top of each cheesecake.
- Bleed them! Spoon warm cherry pie filling over the brains, letting it drip dramatically down the sides.
🌟 Variations & Tips
| Version | How to Make It |
|---|---|
| Zombie Chocolate Edition | Add 2 tbsp cocoa powder to the cheesecake batter. |
| No-Bake Version | Skip baking — use whipped cream + cream cheese filling instead. |
| Ultra-Gory Look | Mix a few drops of black food coloring into the cherry sauce. |
👻 Why You’ll Love This Recipe
✔️ Looks horrifying, tastes glorious
✔️ Perfect make-ahead dessert
✔️ Scares your guests… before making them fall in love
📌 Save It on Pinterest
These mini baked cheesecake cups with cherry “brains” are the ultimate spooky showstopper! Scary to look at, irresistible to eat — perfect for Halloween parties! Bleeding Brain Cheesecake on Pinterest
(Just upload the image with this caption and you’re set!)
🍪 Recipes You May Also Love from MimiYummy.org
If you loved this spooky cake, here are more recipes to bring sweetness and a little magic to your table:
- Bloody Knife Red Velvet Cake 🩸🍰
- Spiderweb Chocolate Cake 🕷️🍫
- Creepy Elegance Halloween Cupcakes
- Soft Ghost Party Cookies💛
🎃 Why Bleeding Brain Cheesecake Cups Are More Than Just Dessert
Most Halloween treats are designed to be cute. However, these are deliciously disturbing in the best way possible. The moment you place them on the table, people gasp — even before they take a bite. That shock factor alone makes them unforgettable.
🧠 A Bite of Horror… and Creaminess
Beneath the glossy red “brain” topping hides a rich, creamy vanilla cheesecake resting on a buttery chocolate cookie base. As soon as your spoon digs in, the cherry “blood” slowly oozes down the sides. It’s creepy on the outside yet heavenly on the inside.
👻 Where Spooky Meets Sweet
At first glance, these mini desserts look terrifying. Surprisingly, they taste like pure luxury. They’re elegant enough for adults yet dramatic enough to thrill kids — which makes them the instant star of any Halloween party.
✍️ Written with love (and cherry-stained fingers) by Mimi 💛