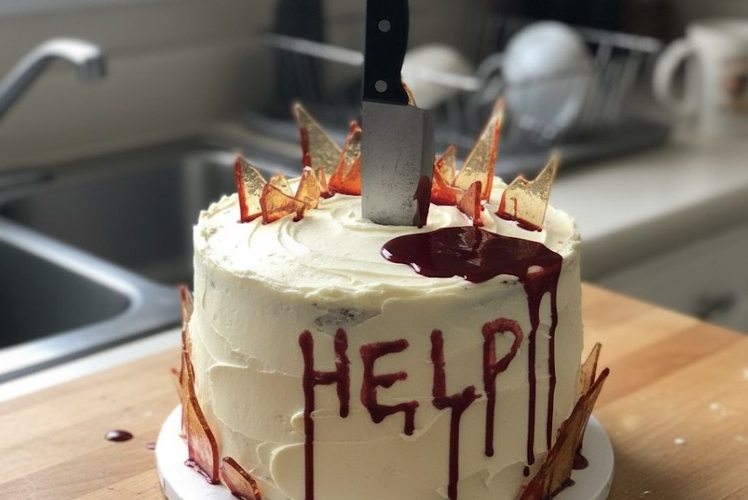
🎃 Why This Bloody Knife Red Velvet Cake Steals the Spotlight
Some desserts are more than food — they tell a story. For instance, this Bloody Knife Red Velvet Cake combines drama and indulgence in every slice. Whether for Halloween or a special spooky party, it instantly makes any table eye-catching.
Baking it brings back playful memories of Halloween nights filled with candy, laughter, and creativity. Additionally, the theatrical knife design allows you to express yourself as an artist in the kitchen. Every drizzle of red syrup adds a whimsical, bold touch.
🩸 Bold, Decadent, and Unforgettable
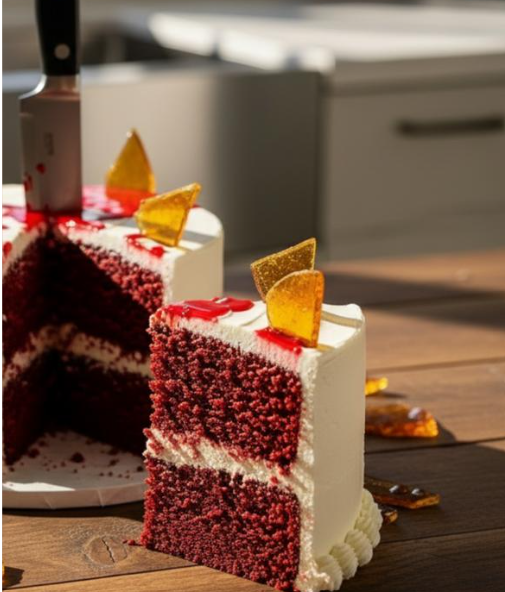
Red velvet cake is already a classic favorite, known for its soft, velvety texture and subtle cocoa flavor. Once paired with cream cheese frosting, it becomes luxuriously indulgent. Moreover, the Bloody Knife design elevates it from a dessert to a centerpiece.
Each slice balances comfort and theatrical flair. It’s perfect for parties, seasonal celebrations, or even a weekend indulgence. Furthermore, this cake is versatile — the design can be simple or extra dramatic depending on your mood.
🧁 Ingredients for Bloody Knife Red Velvet Cake
Cake:
- 2 ½ cups all-purpose flour
- 1 ½ cups sugar
- 1 tsp baking soda
- 1 tsp salt
- 1 tsp cocoa powder
- 1 ½ cups vegetable oil
- 1 cup buttermilk
- 2 large eggs
- 2 tbsp red food coloring
- 2 tsp vanilla extract
- 1 tsp white vinegar
Cream Cheese Frosting:
- 16 oz cream cheese (softened)
- ½ cup butter (softened)
- 4 cups powdered sugar
- 2 tsp vanilla extract
Bloody Knife Decoration:
- Red fruit syrup or raspberry sauce
- Small knife or cake topper for effect
🥄 Step-by-Step Instructions
Step 1: Bake the Red Velvet Layers
First, preheat the oven to 350°F (175°C) and prepare two 9-inch cake pans. Next, combine flour, sugar, cocoa, baking soda, and salt in a mixing bowl. Meanwhile, whisk oil, buttermilk, eggs, food coloring, vanilla, and vinegar in another bowl. Gradually combine wet and dry ingredients until smooth.
Pour evenly into pans and bake for 25–30 minutes, or until a toothpick comes out clean. After baking, let the cakes cool completely.
Step 2: Make the Cream Cheese Frosting
Beat the cream cheese and butter until smooth. Then, gradually add powdered sugar and vanilla, mixing until fluffy. For smoother frosting, chill slightly before spreading.
Step 3: Assemble the Cake
Place one cake layer on a serving plate and spread frosting evenly. Next, add the second layer and cover the top and sides with frosting. Smooth with a spatula for a clean finish.
Step 4: Create the Bloody Knife Effect
Finally, drizzle red fruit syrup diagonally across the cake to mimic a knife “cutting” through it. For extra drama, carefully insert a small knife or cake topper. This finishing touch transforms your cake into a stunning centerpiece.
🍰 Tips for a Showstopping Cake
- Use fresh raspberry or strawberry syrup for natural red color.
- Chill frosting slightly for smoother spreading.
- Bake ahead of time; wrap cooled layers to maintain moisture.
- Experiment with edible glitter, chocolate drizzle, or dark cocoa for extra flair.
💀 Fun Variations
- Chocolate Red Velvet: Add cocoa powder to the dough for a deeper chocolate flavor.
- Berry Mix Filling: Combine raspberries and strawberries inside for a fruity surprise.
- Mini Cupcake Version: Same dramatic effect in smaller servings — perfect for parties or gifts.
📌 Save This Recipe on Pinterest
Pin it here for your next spooky gathering: Bloody Knife Red Velvet Cake on Pinterest
💛 Recipes You May Also Love from MimiYummy.org
- Spiderweb Chocolate Cake
- Black Forest Cupcakes
- 💀 Gothic Romance Cake
- 🎃 Spooky Halloween Black Velvet Cake
✨ Final Thoughts
This Bloody Knife Red Velvet Cake is both playful and indulgent. Each slice offers moist red velvet, rich cream cheese frosting, and dramatic flair. Whether for Halloween, a spooky celebration, or a fun weekend treat, it’s sure to impress every guest.
Recipe by Mimi Yummy 💛